Hi guys!!!
Its been a long time since I posted a tutorial, but it has all been for very good reasons, aside from expanding my waistline with one to many treats (as you do), I have had a lot on and promise to spill the beans all in good time. Talking about expanded waistlines, dont you just hate it when we get those sudden bursts of sunny days that you haven’t conditioned your body for? you know, that “OMG summer is here and I still haven’t kicked these kgs” moment. Well, worry not!! I have taken it upon myself to provide you with this tutorial for an uber cute top that will hide all your wintry sins; yes I am that considerate (and I have an occasion to attend tomorrow, the sun is shining and quite frankly my summer body isnt ready, but I still gotta look cute, O the dilemmas of a Lady!!!) .
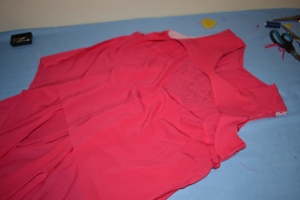
Ok, so here’s what we are making:
You will need;
Fabric
Fusible interfacing
scissors
Pinking sheers
Measuring tape
Ruler
large piece of paper (I have brown paper roll but even newspaper will do)
Chalk and a pencil (with a rubber at the end)
Steam iron.
Measurements needed
Back
Bust
shoulder to bust
shoulder to waist
shoulder to hips
Round sleeve, Round Elbow
Sleeve length, Elbow length
Method
Essentially your piece of paper is going to be used to make a template that will be laid on the bias folded fabric; this is what gives you the voluptuous fall in the back of the top; however, since I always cut the front and back of a bodice together, we will make a template for the front and back in the same manner. I would normally do all what I’m about to show you directly onto the fabric but I have chosen to do a template because of how we will angle it on the folded fabric.
The piece of paper you are using needs to be shoulder to hip measurement long and half the bust measurement +6″ wide. Once you have cut this out, fold it in half and you are ready to start. Note: remember you always work from the centre out, unless otherwise stated.
Step 1
From the top corner, measure 3.5″ along the top edge, then along the folded edge measure down 5.5″ and join these two marks with a rounded semi “v”; this is your front neck hole. Working again at the top edge mark half your back measurement+ 3/8″
Step 2; place the top of your tape on the top edge of the paper measure down 7″ and mark. then mark your vertical measurements+0.5″ (shoulder to waist and shoulder to hips)
These marks will now serve as reference points, along which you will place your horizontal measurements.
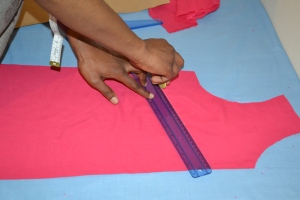
Step 3; along the line of your first reference point (the 7″ down mark) mark a quarter of your bust measurement+2″. Along the last reference point (shoulder to hips, this should actually be the bottom edge of the paper), mark a quarter of your bust measurement+3.5″.
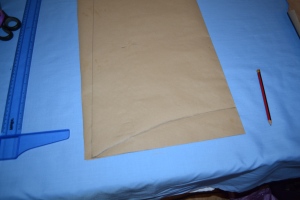
Step 4; From the bottom centre corner, measure up 2.5″ , from here curve a line down that meets with the mark along the bottom edge. Now join the horizontal measurement marks with a straight line; it should look like this.
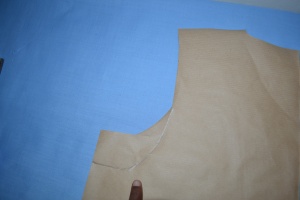
Step 5; At the top of the straight line draw a straight line 2″ in towards the centre, then from the furthest marking from the centre, along the top edge, draw a deep curve the joins the 2″ line you just made. It should now resemble the second picture.
mark 0.5″ along the top of the curve and slant a straight line that meets the corner of the neck hole; this will form your shoulder slope, like so
Step 6; return to the 2″ line you drew and repeat the same, exactly 2″ below it
Step 7; back at the shoulder slope (outer edge) draw a shallower curve that meets the second 2″ line. Inside the neck hole, draw a shallower curve that will form the back neck hole, this really shouldn’t be more than 2″ deep. return to the
Step 8; You are now ready to cut! please pay close attention to this statement; only cut around all outer lines. This is because you are cutting front and back pieces together and not all lines are the same, as you can see.
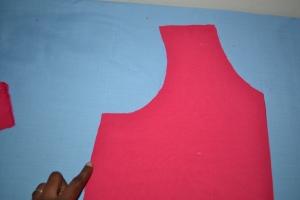
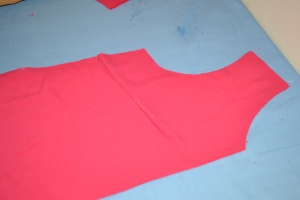
when you have cut out your pieces it should look like this;
cut along the fold, and separate the pieces. Transfer the armhole markings unto the back piece, from the front piece, cut this out, then cut the front neck hole, erase the bottom half of the back armhole curve and cut the deeper front armhole curve.
Templates done and ready to be used. The back piece has the higher neck line and lower armhole, mark them accordingly so you don’t get confused. Believe me, this is a very easy and annoying mistake to make.
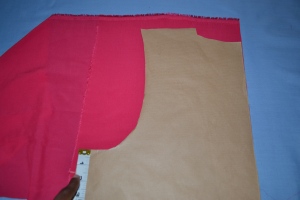
Step 9; for the back piece, fold the fabric at a 45 degree angle (raw edge folder over to line up with selvage edge)
Lay your back template piece on the fabric as shown in the picture (note; the centre of the template is facing the folded edge),
along the bottom draw a curve that is lower at the folded edge, and slopes upwards to meet the bottom outer edge of the template. It should resemble this:
cut this out and set aside.
Step 10; Fold another piece of fabric as you normally would if you were cutting out a pattern piece, line the centre of your front template with the fold and cut out.
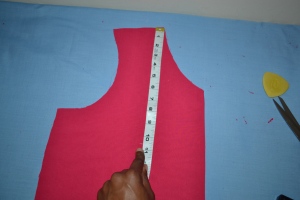
This top will need some side bust darts, although the top is not fitted, darts will help it hang better on the body. To create the darts, place the top of your tape measure at the highest point of your shoulder seam, measure down your shoulder to bust measurement and mark. along the side seam place a mark about 1″ lower than the mark you just made;
draw a straight line that connects these two marks, then press along this line:
Unfold the piece and use your iron to invert the right side facing crease. these are your dart lines (the centre of your darts), use your tape to measure a dart that is 1″ deep and 5.5″ long, draw this with chalk:
set this aside.
Step 11: To make the facing for the front and back pieces, lay the template pieces on the fold of fabric cut right around the neck, shoulder and armhole, stopping 1.5″ beyond the armhole, along the side seam. lift the template up and draw an arch that curves towards the neckline.
Cut this out and use the pieces as templates for cutting the matching fusible interfacing. Fuse the interfacing to the facing, snip along the bottom edge with pinging sheers, turn up a single 3/8″ hem and sew.
Construction
Step 12; sew your darts
Step 13. Lay the facing over the relevant piece, right sided facing each other, pin (if you must) and sew with a 3/8 seam allowance. Press the seam allowance towards the facing and top stitch on the right side of the facing (this is done right at the edge of the seam). press
step 14. You will now treat the facing and the top pieces as one. Lay the front piece on top of the back piece, right sides facing inwards, pin the side seams
sew with a 0.5″ seam allowance.
step 15; open the shoulder seams so that the right side of the facings are facing each other and the right sides of the front and back piece are facing each other, sew it like this:
your top will now look like this inside out:
Finish the hem by doing a double turned hem, I thing this is the best way for this top.
for sleeves follow my tutorial on sleeves, the link is: http://chinelobally.com/2014/02/04/busy-bee-how-to-cut-a-sleeve-without-a-pattern/
sew in your sleeves and there you have it, the most forgiving top ever.
I have added a leather appliqué to the neckline of mine and also added shoulder pads for extra sharpness. I’m thinking, black skinny jeans and heels?.
I really hope give it a go, and please send me pictures of your completed garments, I get sew excited (sorry, I couldn’t help that) when I see what other people have done. As ever if you have any questions just send them over and I will try my best to answer.
Have a blissful week
xxx










Hi Chinelo. I am a bit late to the party because I have only just finished watching the recorded Sewing Bee! (My daughters made me save them until they came home from uni for Easter). I would love to go on one of your sewing courses for making clothing without a pattern. I would love to know when the next one is. Many thanks, Karen
Chinello, you are the Queen! beautiful, as usual.
Wow! I must try that top, thanks for the tutorial.
Glad you like it! Picture of completed top please xxx
Oh I forgot to ask what type of fabric did you use? Many thanks!
Chinelo, you looked fabulous in this top today at The Cloth Clinic opening.
Once I must tried one of your tuto ! I really admire your way of doing things !
Dear Chinelo,
On ‘Sewing Bee’ I admired your work. Especially the way your clothes fitted so beautifully!
Now I know why. You showed us. Good for you!
Because I live in The Netherlands, I can’t come to your workshops. But I am enjoying your tutorials so much !! For years, I wished for myself could draw patterns that fitted my body! The patterns I buy of course never do and fitting is so important to me.
So, now I learned now how to measure not only myself but everybody and when I practise a lot, I can make not only clothes that I like but fitting me perfectly! Happy, happy.
By reading this tutorial (Hi-low Top Tutorial – The “hide it all but still chic” Top) I noticed that there were a few words missing:
(Step 7; back at the shoulder slope (outer edge) draw a shallower curve that meets the second
(2″ line. Inside the neck hole, draw a shallower curve that will form the back neck hole, this
(really shouldn’t be more than 2″ deep. return to the …????)
Our text ended by: Return to and I like to know where I suppose to return to.
( Maybe I am not that clever as I think I am. )
Will you please show me the way toward I suppose to return to?
Thank you very very much.
Anna Vorstenbosch,
Eindhoven
The Netherlands.
On ‘Sewing Bee, you made also another sleeve. On top of the shoulder you made a …. I don’t know the English word for ‘plooi’. I hope you know what I mean.
Will you give us please a tutorial on the internet for this sleeve to?